Zeus Complete Tutorial | Building bot & Install Cpanel
Zeus Botnet Overview
Zeus is a toolkit that provides a malware creator all of the tools required to build and administer a botnet. The Zeus tools are primarily designed for stealing banking information, but they can easily be used for other types of data or identity theft. A Control Panel application is used to maintain/update the botnet, and to retrieve/organize recovered information. A configurable Builder tool allows to create the executables that will be used to infect victim’s computers. These executables are usually detected as ZBot by anti-virus software.
There is no single Zeus botnet. The toolkit is a commercial product that is sold to many different users, and distributed freely to many more. Each of them can create one or more botnets of their own, so the number of Zeus botnets is likely quite large.
The latest version of the toolkit typically sells for about $700 USD to trusted buyers, with the bot source code possibly available for a much larger sum. After a few months the new toolkit version is released as a free “public” version, which is probably meant to serve as a promotion for the commercial version. The public version may not include all of the latest functions, and the documentation is minimal. Modified versions of the public toolkit have also been offered for sale at lower prices by third party developers, sometimes known as “modders”.
Configuration and Bot Creation
The first step in building a bot executable is to edit the configuration file. The configuration tells the bot how to connect to the botnet, and it also contains information on what user data to gather and how to do so. The configuration file is in two parts, as described below.
Static Configuration
The StaticConfig is compiled into the bot by the Builder tool. It contains information that the bot will need when it is first executed. To update the StaticConfig the bots must be ordered to download a new bot version.
The available settings are:
The name of the botnet that this bot belongs to.
The amount of time to wait between dynamic configuration file downloads.
The time interval between uploads of logs and statistical information to the drop server.
The URL where the bot can get the dynamic config file.
A URL where the bot can check its own IP address, to determine if it is behind a router or firewall.
The encryption key that is used to hide information transmitted within the botnet.
A language ID list that tells the bot to go into a dormant state if the infected computer’s language is on the list.
Dynamic Configuration
The DynamicConfig is downloaded by the bot immediately after it is installed on a victim’s computer. This file is downloaded at timed intervals by the bot, and can be used to change the behaviour of the botnet. Most of the entries control how information is collected from the infected computer.
Available settings include:
A URL where the bot can download a new version of itself, if the command to do so is given.
The URL of the drop server where logs, statistics and files will be uploaded and stored.
Information used to inject additional fields into web pages viewed from the infected computer.
A list of URLs where an emergency backup config file can be found.
A set of URL masks used to cause or prevent logging of information.
A set of URL masks to indicate that a screen image should be saved if the left mouse button is clicked.
A list of pairs of URLs that are used to cause redirection from the first URL to the second.
A set of URL masks used to collect TAN (Transaction Authentication) numbers – used by some banks for online authentication.
A list of IP/URL pairs that are inserted into the infected computer’s hosts file to override DNS lookups.
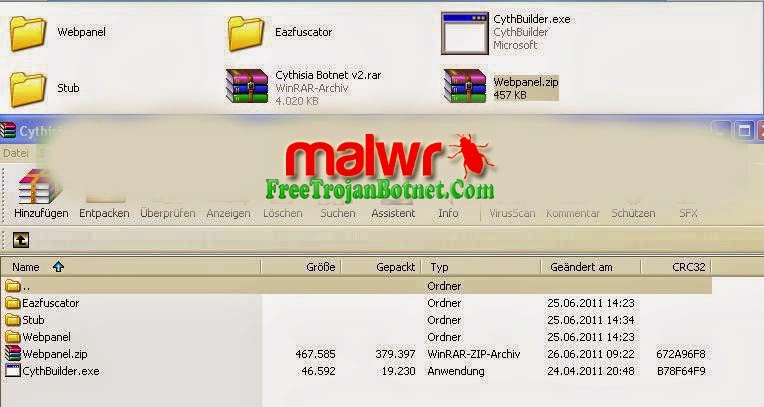
Building the Bot
Once the configuration file is ready the Builder tool is used to build the encrypted dynamic configuration file and the bot executable file. The Builder first checks the computer it is running on to see if the Zeus bot is installed and gives the user the option to clean the system. This is probably meant to make it easier to test configuration settings. The Builder will then report system information as seen in Figure 1 below:

Figure 1: Zeus Builder – Information
Using the Builder, the aspiring botnet master can click the “Build config” button to compile the configuration file into its encrypted form. An option to edit here is also provided. When this file is ready it is placed on the server where the bots have been told to look for the DynamicConfig. Distributing the configuration file this way makes it easy to update the settings in the future. The image below shows the Builder output after the config has been built. If any error occurs during the build it is detailed here.
Figure 2: Zeus Builder – Compiling configuration
Then, by clicking the “Build loader” button, the distributable form of the bot executable can be assembled and saved. The button can be repeatedly pushed to produce internally identical bot executables with different encryption. The sizes of the PE file sections are also changed in each new build. The image below shows the information displayed by the Builder after the bot has been built.
Figure 3: Zeus Builder – Assembling configuration and binary
Because new versions of the same bot configuration can easily be created it is fairly easy to keep enlarging the botnet when anti-virus software begins to detect the earlier versions.
Bot Distribution and Installation
The Zeus bot has no built-in capability to spread to other computers. In most cases a spam campaign is used to distribute it, either as an attached file or a link. Some type of social engineering within the spam message is used to trick the victims into executing the bot. A wide variety of these tricks have been seen, often in forms that are persuasive and difficult to detect. The large number of social engineering tricks is a result of many individuals attempting to seed their own botnet, using the common Zeus platform.
The lack of worm-like spreading capabilities makes the bot suitable for targeted attacks, since the bot is less visible and less likely to be detected. In targeted attacks, it can be sent to the intended victim in various disguises until success is achieved.
When the bot is executed on a victim’s computer it goes through a number of steps to install and configure itself, and to connect to the botnet. The filenames given here are for the tested version, and sometimes are changed in new versions. Outlined below are the steps taken upon initial execution:
The install function searches for the “winlogon.exe” process, allocates some memory within it and decrypts itself into the process.
The bot executable is written to the hard drive as “C:WINDOWSsystem32sdra64.exe“.
The directory “C:WINDOWSsystem32lowsec” is created. This directory is not visible in Windows Explorer but can be seen from the command line. Its purpose is to contain the following files:
local.ds: Contains the most recently downloaded DynamicConfig file.
user.ds: Contains logged information.
user.ds.lll: Temporarily created if transmission of logs to the drop server fails.
The Winlogon (“HKLM/SOFTWARE/Microsoft/WindowsNT/CurrentVersion/Winlogon“) registry key’s value is appended with the path of the bot executable: C:/WINDOWS/system32/sdra64.exe. This will cause the bot to execute when the computer restarts.
The Windows XP firewall is disabled. This causes a Windows Security Center warning icon to appear in the system tray, the only visible indication that the computer has been infected.
The bot broadcasts an “M-SEARCH” command to find UPnP network devices. This may be an attempt to access and reconfigure local routers.
The bot sends an HTTP GET command to the configured botnet server to get the latest DynamicConfig file.
The bot begins capturing and logging information from the infected computer. The DynamicConfig file largely determines what information is collected.
The bot sends two HTTP POST commands to upload log (user.ds) and stat information to the botnet drop server.
Three timers are set to values in the StaticConfig, each executing a function on time-out:
Get new config file (DynamicConfig) from server (default 60 minutes).
Post harvested data (user.ds) to server (default 1 minute).
Post statistics to server (default 20 minutes).
If a web page that is viewed from the infected computer is on the injection target list in the DynamicConfig, the additional fields from the list are injected into the page.
If the HTTP “200 OK” reply to a POST contains a hidden script command, the bot executes it and returns a success or failure indication along with any data (see Communication section below).
Botnet Command and Control
Control Panel Installation
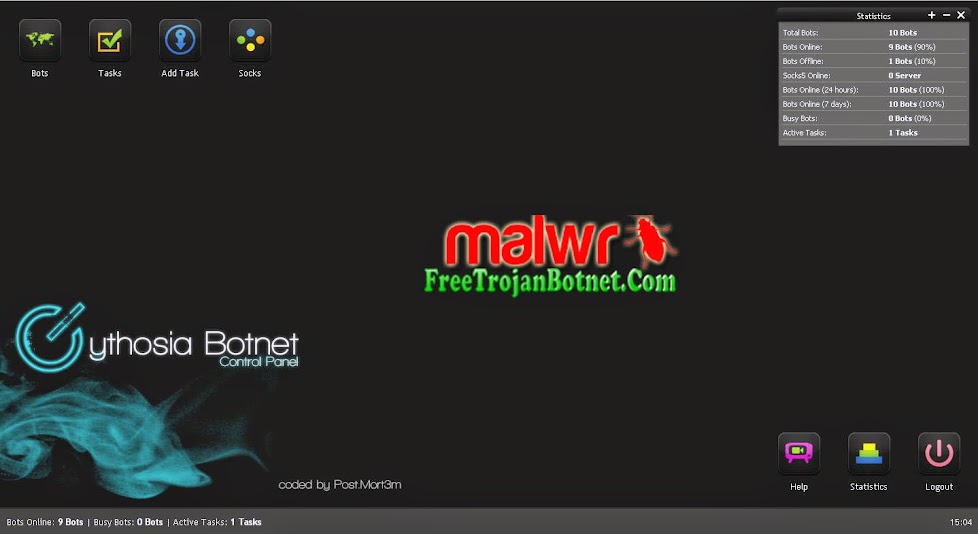
The Zeus Control Panel application is mainly used to track the state of controlled botnets and to send script commands to the bots. It also provides an organized way to view and access information collected by the bots from infected computers.
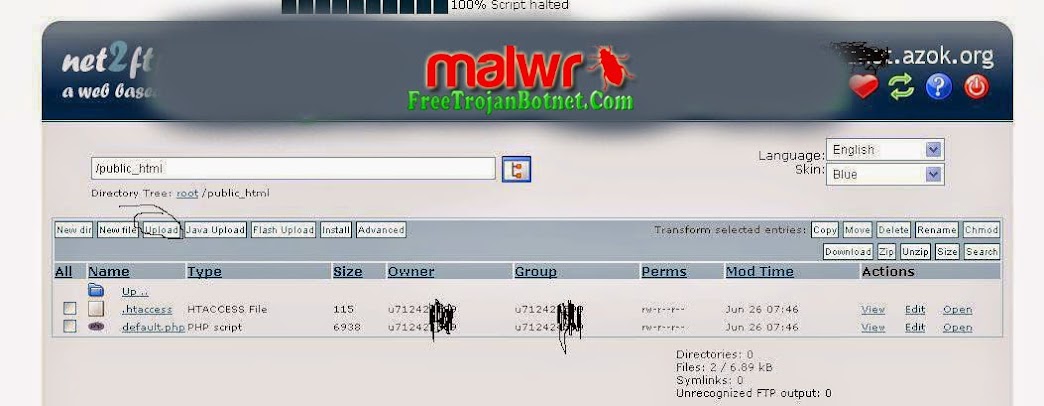
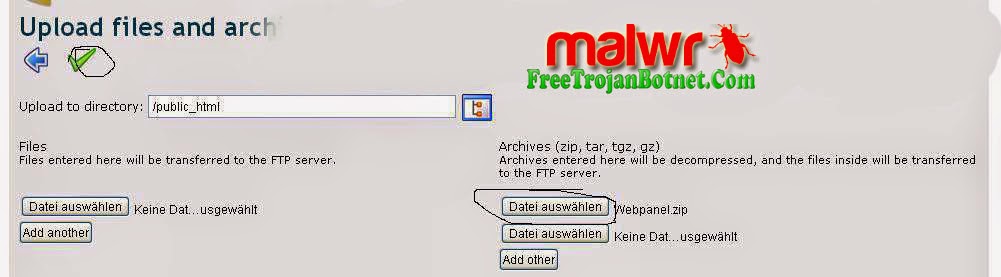
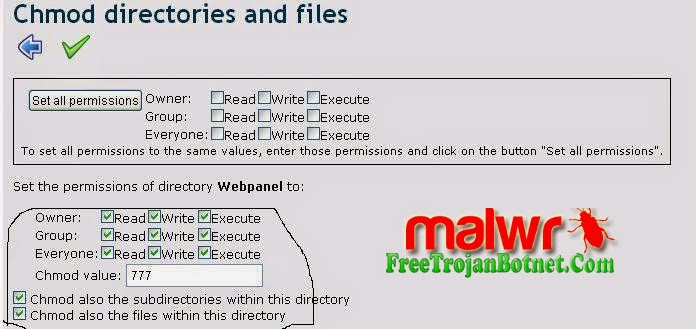
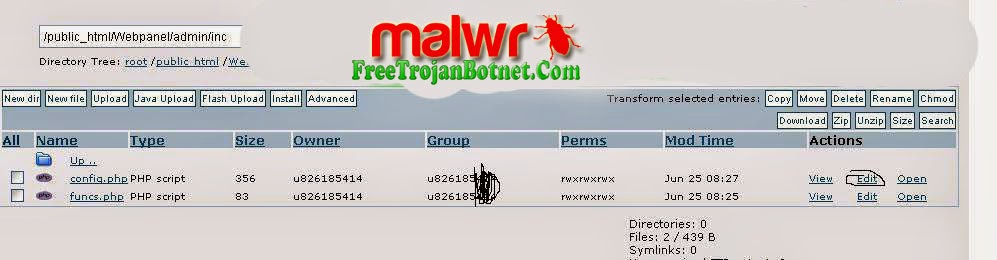
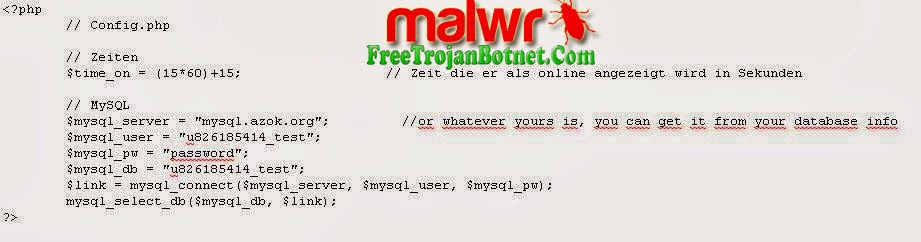
The Control Panel is an open source PHP application that can be run on an IIS or Apache web server. Some additional software, most of which is specified in the documentation, is also required. A MySQL user with appropriate permissions must also be set up. When the system is ready the Control Panel code can be copied into the web server directory. The install page can then be accessed from a browser. If any errors are made when filling in this form, the user is given a helpful message. Once this form is completed the remainder of the setup is done automatically.

Figure 4: Zeus Control – Installation configuration
Botnet Administration
After logging into the Control Panel, the initial page is displayed, as shown in Figure 5 below:

Figure 5: Zeus Control – Index
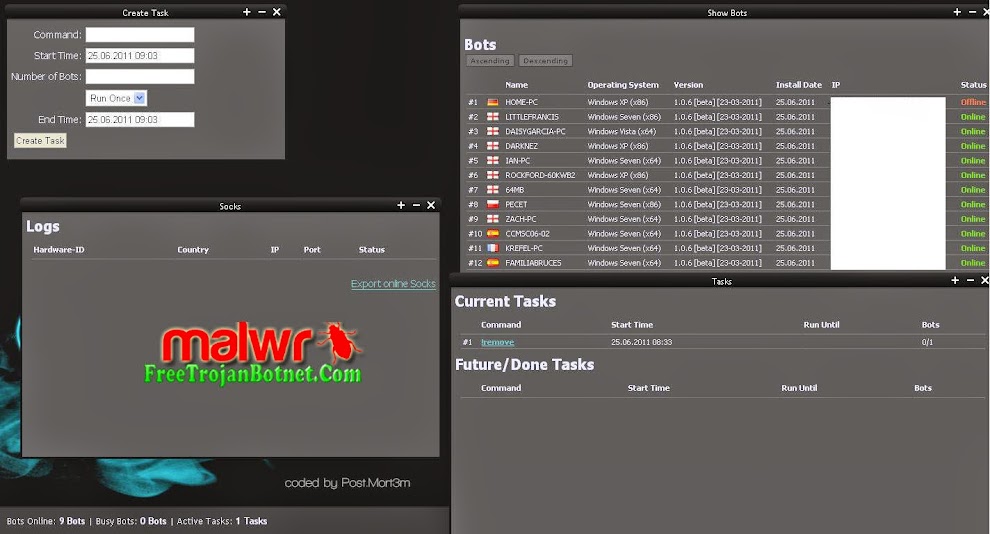
At the left is a menu where various pages can be accessed. At the right is a summary of information about the botnet. Notice that multiple versions of the bot can be administered with one version of the Control Panel. If the “OS” item on the menu is clicked we get a list of operating system versions in the network with a count of bots for each version. The next menu item is “Bots”, which initially displays the “Filter” form. Here the user can select “Inside NAT” or “Outside NAT”, “Online” or “Offline”, etc. to filter only the most interesting bots.

Figure 6: Zeus Control – Display Filter and Bot List
Clicking “Accept” results in a list that displays some basic information about each of the bots. The “Bot ID” is an automatically generated unique identifier for the bot. The “Comments” field shows any comments that have been added by the user. The “Bots action:” drop-down menu allows some more information to be obtained, for example the selected “Full information” option results in the additional details displayed in Figure 7. The user can add comments here, and the “Used” field can be set. The purpose of these seems to be to allow more exclusive filtering of the bots displayed on the list shown above.

Figure 7: Zeus Control – Full Information
The next item on the main menu is “Scripts”, which displays a list of scripts that have been set up by the user. These scripts are used to send one or more of the built-in commands to the bots (see Communications below).
Figure 8: Control Panel – Script List
Clicking on “Add New Script” or on one of the script names causes the edit dialog to be displayed. Here status of the script can be set to “Enabled”, so that it will be distributed the next time the bots check in. The range of distribution can be limited to one bot or one botnet, or to the listed countries. This is important for location based services (LBS). In the context field one or more script commands can be entered.

Figure 9: Control Panel – Script Edit
If the script has been sent to any of the bots, an information box shows each successful transmission to a bot and whether it failed or was executed. Badly formed scripts fail at the bot, not at the Control Panel, which seems to do very little checking. Clicking the question mark next to “Context:” displays a list of currently available script commands with explanations. The commands can be used to collect more information, to make changes to the botnet or to give greater control of the infected computer.

Figure 10: Control Panel – Script Commands
The “Reports:” section of the main menu contains two options for handling information stolen from infected computers. Information other than files are put into the MySQL database, and can be viewed by clicking the “Search in database” option. The image below shows the search dialog and some information that has been found.
Figure 11: Control Panel – Database Search

Figure 12: Control Panel – Password Capture Report
Among the first items in the list are some with captured login information. An example of the details these entries contain can be seen in Figure 12. The second option in the “Reports:” section is “Search in files”. This is where files that are sent back from the bots can be found. As usual a search dialog is provided, because the number of files coming in from a large botnet will be very high.
Figure 13: Control Panel – Files Search Dialog

Figure 14: Control Panel – Files Search Results
Figure 13 shows an unrestricted search, with all the files that have been sent by the bots and the directory structure they are held in. There is a main directory for each bot. Screen captures are placed in a “screens” folder, under another folder named with the URL being viewed when they were captured. These are the screen captures made when the left mouse button is clicked. Certificate files that were captured when the getcerts command was given are located in the “certs” folder.
The file autorun.inf was uploaded using the command “getfile D:autorun.inf“, so it has been placed inside a folder named “D:“, based on its original path.
By clicking on a file name, any of the files can be downloaded or viewed. Alternatively, the checkboxes can be clicked for the items the user wants, and the “Create archive and download” option can be chosen under “Files action:”.
Under the “System:” section of the main menu, the “Information” item shows some version numbers for the Control Panel installation. The “Options” item allows changes to some setup options, including the botnet encryption key. Before the encryption key is changed, the bots must be ordered to download a new bot build with the new key.

Figure 15: Control Panel – System Options

Figure 16: Control Panel – User Options
Figure 16 shows the “User” item in the main menu, which allows password and language changes for the primary user. There is also an option to change the format of the screenshot images. The Control Panel provides a powerful and easy to use GUI interface for the botnet. Since Zeus is a commercial product, this kind of feature has the advantage of making it more desirable to prospective buyers, especially relatively non-technical buyers.
Botnet Communications
All Zeus botnet communications pass between the bots and one or more servers. Only one physical server is needed, but additional ones can be used to distribute bot file updates and fallback configuration files.
Data sent through the Zeus botnet is encrypted with RC4 encryption. In this implementation a key stream is generated from the botnet password, and is XORed with the data. The same password is used to encrypt all data that is passed through the botnet. Changing the botnet password requires that all of the bot executables be updated to a build that includes the new password. The dynamic config file also must be updated and the server password changed from the Control Panel.
When a computer is infected with the Zeus bot, its first communication with the server is a request for the dynamic config file. Unlike other data sent through the network, the config file has already been encrypted by the Builder application and can be sent without further processing. Figure 17 shows the config file being requested by the bot, returned by the control server.

Figure 17: The bot gets the dynamic config file
When the config file has been received, the bot will retrieve the drop server URL from it. The bot then HTTP POSTs some basic information about itself to the drop server, to log in and indicate that it is online. As long as it is running, the bot continues to HTTP POST encrypted logs and statistics to the server at timed intervals. By default logs are sent at 1 minute intervals and statistics are sent every 20 minutes.
Figure 18: The bot POSTs basic information
When a bot posts data to the server, the server replies with an HTTP/1.1 200 OK response. The Zeus server conceals an encrypted message as data within the response. This data field is used to send commands (scripts) to the bot. Below is an example of the default data when no command is being sent, which is the most common case.
Figure 19: The server reply to the POST contains some data
When a command script is being sent by the server, the data size will be considerably larger than the standard response. Figure 20 shows a sent getfile command, resulting in 82 bytes of encrypted data.
Figure 20: The server reply to the POST contains a command
Web Page Injection
One important feature of the Zeus bot is its ability to dynamically inject dynamic into web pages viewed from an infected computer. This is done on-the-fly, as data passes from the server to the client browser. A snippet of the configuration data for this is shown below. It does a fairly straight forward search and insert operation:
set_url http://www.bank.com/login.html GP
data_before
name="password"*</tr>
data_end
data_inject
<tr><td>PIN:</td><td><input type="text" name="pinnumber" id="pinnumber" /></td></tr>
data_end
data_after
data_end
The set_url parameter identifies the page to be attacked, data_before contains the text to search for before the injection point and data_inject has the text that will be injected. Figure 21 shows a login page before and after injection.

Figure 21: Login form before and after injection
This is a just simple demonstration. In practice more elaborate deceptions can be created, for example the injected changes could pretend to deny access and ask victims to confirm their identity by filling in additional fields. Below is the HTML source before injection. The data_before search text is highlighted.
<TR>
<TD>Username:</TD>
<TD><INPUT id=username name=username></TD></TR>
<TR>
<TD>Password:</TD>
<TD><INPUT type=password name=password></TD></TR>
<TR>
<TD colSpan=2><INPUT type=submit value=Submit></TD></TR>
The following is the HTML source after injection, with the code inserted from the data_inject field discussed above.
<TR>
<TD>Username:</TD>
<TD><INPUT id=username name=username></TD></TR>
<TR>
<TD>Password:</TD>
<TD><INPUT type=password name=password></TD></TR>
<TR>
<TD>PIN:</TD>
<TD><INPUT id=pinnumber name=pinnumber></TD></TR>
<TR>
<TD colSpan=2><INPUT type=submit value=Submit></TD></TR>
The currently distributed configuration file contains default settings for injection attacks on more than 100 URLs. A well executed attack can be very difficult for a victim to distinguish from a genuine web page.
Download https://mega.nz/#!eFMCARSY!kZrfystCCnTW21cNAdLRDt-bUOiCLbzyMLGlBjoi5gU